Why Blog 2.0
My blogging journey began about four years ago. My blog was built to provide me with a tool to catalogue my thoughts, ideas and any tips / tricks / hacks I’d picked up on my tech rollercoaster ride. I also wanted this to be my contribution back to the tech communities I often rely on for my own growth. So where do you start when you want to blog stuff… Wordpress!
I had my wordpress site for about 4 years, but honestly always struggled to find the motivation to perfect blog posts and get them published. My personal experience of Wordpress is that in some cases, the drive to become the blogging platform for all had led to an authoring experience I found fairly painful and inefficient. The constant need to apply updates to plugins to remain secure etc… was something I was keen not to have to do. This led to the site being barely updated. Loads of articles drafted but never published. I too had become very inefficient. I needed a change. I needed some inspiration.
Massive shout out to Joris De Gruyter who in his blog post “The Making of” outlined the process of moving to a static website hosted in Azure. He outlined the main tech needed to build the site:
- Jekyll will be used as the static site generator. Markdown, Liquid, HTML & CSS go in. Static sites come out ready for deployment.
- Azure will be used to serve our content
- cloudflare will be used to apply the custom domain and cache the sites content from Azure
This resonated with me immediately. I want the efficiency of a static site that is easy to author and maintain, and as somebody who works with Microsoft tech on a daily basis, using Azure seemed like a perfect platform to host the site…. Sold! Blog 2.0 was born!
Here’s the how
WSL
Jekyll is the first tool on the list. But… if you’re like me and your using Windows to build this, there’s a pre-requisite required. Jekyll doesn’t officially support Windows, so for the best experince, we need to enable WSL. To do this you need to navigate to Windows Features (Windows Key -> type “turn windows features on or off”), tick the box to enable Windows Subsystems for Linux and follow the guided process to get that enabled.
That installs the base WSL1 tooling, but Microsoft have rolled out WSL2, so to enable this, firstly enable the virtual machine platform. Open PowerShell with elevated privs (right click powershell and hit “Run as administrator”). When Powershell is running copy and paste the following command into PowerShell:
Enable-WindowsOptionalFeature -Online -FeatureName VirtualMachinePlatformApply the WSL 2 kernal update if you need it by downloading the updater from Microsoft here. If you needed that, and once completed, open PowerShell as admin again and run the following command:
wsl --set-default-version 2WSL is now enabled with WSL2 ready to install a Linux distro.
Install Linux
Head to the Microsoft store, and search for Ubuntu and select the latest version. This is 20.04 LTS at the time of writing. Install it and then Launch it. This will at prompt you to enter a username and password. This is for Bash only. Make sure you select a username and password that you can easily remember and make a note of these credentials. They’ll be needed whenever you need to run commands into Ubuntu through the bash window under elevated priveledges (sudo).
One final check after installing Ubuntu is to make sure it’s now running under WSL2 correctly. To do this, open a PowerShell window again and enter the following command:
wsl --set-default-version 2If all of the above has been successful, you should see the following:
  NAME            STATE           VERSION
* Ubuntu-20.04    Running         2
Install Jekyll
Now we can move onto to setup Jekyll. For the latest instructions on how to do this, head to the Jekyll website Windows installation steps. Don’t close the bash window just yet.
After running all of the steps outlined in the Jekyll instructions and verifying the version installed, the next step is to create a directory to run the site from (for example c:\blog). After creating the directory, back in the bash window, navigate to the location you just created. Because we’re not on a linux console, we need to navigate to the directory as linux sees it. In bash type the following:
cd /mnt/c/blogNote the forward slash and the root being mnt.
Once we’ve naviagted to the site location, run the following command to create the basic Jekyll website template - substituting “
jekyll new <name>Jekyll sites need to be build so that they can be deployed as static sites. So, now we have our basic Jekyll site deployed, make sure your bash path is pointing at the blog folder and type the following:
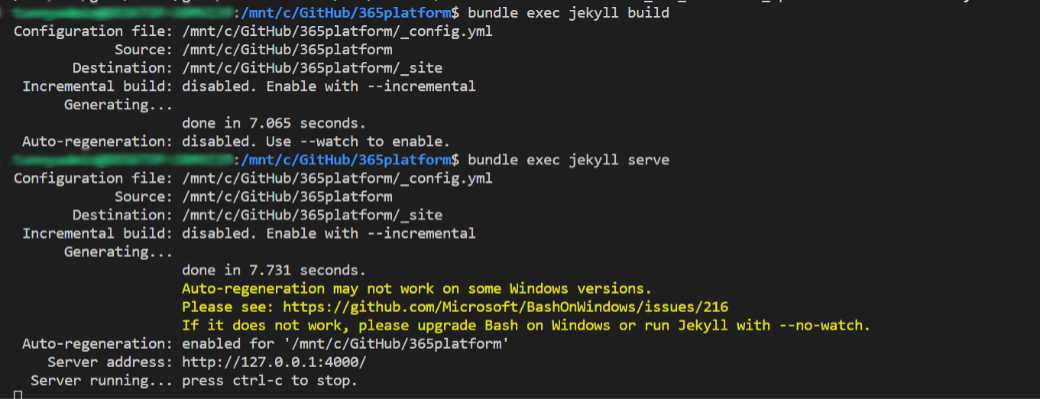
jekyll buildThis will build the site for us and put all of the static content into a folder called _site. We can now test this locally by running the following in our bash window:
jekyll serveThis will now generate a local webserver and allow the site to be viewed at a local url which will be shown in the bash output. Mine is as follows:
 Auto-regeneration: enabled for '/mnt/c/GitHub/365platform'
    Server address: http://127.0.0.1:4000/
  Server running... press ctrl-c to stop.
So now we have the basic mechanics of the Jekyll static site up and running. Over the course of the next couple of blogs we’ll explore how to get Visual Studio code set up as the authoring tool, set up the static site in Azure using Azure blob storage and then use Cloudflare as the final piece of the puzzle.

